Wednesday, October 29, 2014

Gownie!

Baby be Mine 
Labor Gownie Review 

I have shared my birth story with most of my family but haven't taken the time to write it out, journal it, or share it on the internet, one of these days I will. I have friends that shared their birth stories on blogs and when expecting, I found it very helpful to read all the good, the bad, and the ugly so I could be "prepared". It still did not prepare me for my own adventure! One part of my birth story that I would like to share, since I have written about mama products previously, was the birthing gown that I went out of my way to purchase and wear for my baby girl's birth. 

Wearing a pretty gown was something I decided I wanted to do when our birthing class instructor mentioned it as not a totally crazy thing to do. She said "think about it, you are feeling less than glamorous, and at least there is one thing going for you, you have a pretty, cute gown on!". Sounded good to me, and I was glad I did it! I got SO many compliments from the nurse staff, and in the pictures I really did think it looked cute! When they made me change it to one of their gowns hours after the birth, I was wishing I had a second one, because it really was much better and I felt better in it! 

Gownies - Maternity Hospital Gown (L/XL pre pregnancy 10-16, Kate Gownie)
Baby be Mine Gownie from Amazon here

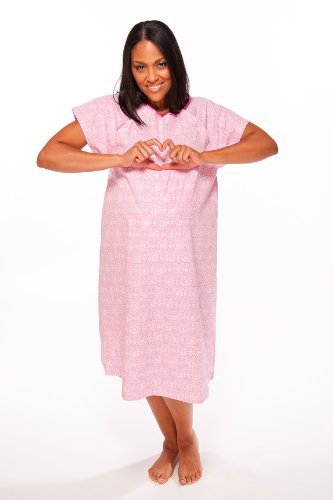
I purchased a Baby Be Mine "Gownie" in the pattern "Kate" (ironic!) because I wanted to wear pink for the birth of my baby girl, and also it is a good color on me. I purchased this on Amazon, but there are many sites and types of gowns out there. This one was perfect, no problems with anything getting in the way. And the snaps along the top front allow for breastfeeding!  Also I liked that the back had button snaps straight down the back so no "draft" aka no bum hanging out walking around the hall! There are lots of patterns to choose from too! 


Arriving in our hospital room!
  
Hooked up to monitors and waiting


Me and baby girl!

For other things in my hospital bag I've made a list here. I'd like to think I will remember all this for next time, but already the sleep deprivation and attention to my little bundle is making me realize it will be much harder to remember all this, so this is my way of reminding myself for the future too! 


Wednesday, October 22, 2014

Steak with mushrooms, onions, gorgonzola

Steak with mushrooms, onions and gorgonzola

My husband loves steak, and although a well cooked steak with salt and pepper is good, we come up with ways to keep it interesting from time to time.

This is a simple way to make a fancy steak dinner, this is a frequent meal for us without taking to much time. You can tailor the steak choice to your preference, and sizes needed. I typically eat a six oz steak and my husband more like eight oz.

Ingredients:
2 strip steaks ~6-8 oz each.
1/2 medium onion cut into strips
1/2 cup sliced mushrooms
1/4 cup crumbled gorgonzola
Grill mates steak seasoning or the following: salt, pepper,
1/4 cup extra virgin olive oil
1/4 cup red wine to cook (the rest to serve with the meal of course)
Shown here:
Green beans and baked potato as sides.

Method:
1.Season the steaks on both sides and let rest on a plate, you also want them to come to room temperature if they've been in the fridge.
2. Prep the baked potatoes, heat in the microwave for 5 mins before putting them in the oven at 350 wrapped in foil with olive oil drizzle, some salt and pepper.

3. Heat a pan on need high heat with the olive oil. When hot add onions and sweat until translucent.
4. Then add the mushrooms and deglaze the pan with the wine. Sprinkle with salt and pepper, and let cook down. If the mushrooms look dry add some oil. When finished to tenderness desired transfer to small serving bowl.
5. In the same pan, sear the steaks on high heat on the stove, 3 mins on each side. Then transfer the pan to the oven for 3-5 mins to desired doneness. This should produce a medium cooked steak.
When done place steaks on a plate to rest.
6. I quickly add green beans to the pan with olive oil and a tsp of water. Season with salt and pepper.

Serve steak and top with cheese, onions and mushrooms. Plate with potato and green beans. Paired with cabernet savignon.

Beef Stew

CrockPot Beef Stew

Beef Stew is one of my favorite crock pot recipes, and is perfect for chilly rainy days.
This recipe is full of vegetables, some red wine and lots of flavor

Ingredients:
1 large onion chopped
1 cup  carrots cut up (I cut baby carrots in half)
1/2 cup celery, diced
2 cups potatoes (I use gold, about four small)
1 cup green beans (fresh or frozen)
1 cup corn (I use frozen which I always keep sound to throw into dishes)
2 packs stew beef (about 2.5-3 lbs)
1 cup favorite red wine, should be heavy like Cabernet Sauvignon. (Here I used a Malbec)
From here you can either use a store  bought pocket for ease, or make a broth.
For the broth:
3 cups beef broth
1 tsp onion powder
1 tsp garlic powder
1 tsp paprika
2  fresh thyme sprigs
1 large bay leaf
Salt and pepper

Method:
Add the stew beef to the crock pot and season generously with salt and pepper.
Prepare the vegetables and add to the crock.
Prepare the broth liquid and pour over crock contents.
Cook on low 7+ hours, or on high 5+ hours. Really the longer it cooks the better!
The thing I love about soups is they are hard to mess up. If you need more veggies or prefer something else, add it or leave it out, this is just my favorite mix. The red wine adds a little something and is perfect to drink with it!

Tuesday, October 21, 2014

Removing wallpaper

How To remove wallpaper! OR NOT! 

Most people who have done some home renovating or just updating, have run into the dreaded wallpaper removal. Although wallpapering is returning as a trend with bold patterns and stylish designs, that will someday also be torn down in disgust, it is not as easy to change as painting over a color, so it is frequently left on the walls for years and years becoming the "next owners problem".

So, to remove wallpaper, there are several approaches, and here is a basic rundown of the steps needed to remove it.

First method: STEAM


Removing a wallpaper mural with steam


1. Step one is to use a wallpaper scoring tool that can be purchased at any Home Depot, Lowes, or local hardware store. We used the PaperTiger tool shown below. *Note do not apply too much pressure as this will go through the paper and to the drywall.

PaperTiger Wallpaper Removal Scoring Tool


2.  Step two is to steam the walls in sections and peel the paper off as you go. Scoring the wallpaper allows the steam to get under the paper to loosen the adhesive. We have a Shark steam mop which we used the flat attachment with


.
3. Step three is using a multi tool or paint scraper to remove the paper as well as the adhesive layer.


4. Finally, a sponge and some soapy water should remove any remaining gooey leftovers.


Removed and ready for prime and paint

So all that is great, and many people know that information. Also, there are many sites and DIY Network can probably guide many people through the same steps to successfully remove wallpaper. But what if there is no way you can remove the wall paper?? Here are some steps if you have a room like we did where some truly ugly atrocious wallpaper was applied onto plaster.  

Second method: PAINT

1. Determine there is no steaming off the wallpaper. This may result in a mess if you attack the whole wall like we did below. My tip would be if you suspect there is no drywall, on an old house for example, test a small spot- either peel the paper back and determine if it was applied onto drywall, painted drywall, or plaster, or use the paper tiger and steam on a small section. 


2. Decide to paint over the wallpaper. This is a better option than drywalling over the area, but that can also be done with 1/4" drywall- for that option I would recommend a professional.


3. Step one to paint over the wallpaper is to SEAL all THE SEAMS


4. Using a multi-tool or paint scraper, fill in the seams with drywall mud. Ensure to scrape them clean, do not leave a thick coating over the seam, just enough to smooth the seam or gap.


5. Sand all of the seams when the mud has dried. Patch up any spots that don't seem smooth.


6. Prime and Paint over said hideous wallpaper!


First, use a good primer, we used two coats to try and even out the lumps and bumps. You could use a better brand that only requires one coat, but I wanted to make sure the smoothness was there.


When primer coats are dried fully, paint over with final paint color. Again one or two coats depending on the paint. Using red, it is hard to get a solid first coat, so we made sure to buy premium paint since we didn't want to do this large room twice. Two coats of primer also helps with this. 


You will also notice the white woodwork has been painted. Follow my "how to paint wood paneling" for instructions on painting woodwork such as this for a bright white result! 


ENJOY the FINISHED RESULT:


A truly awesome rec room! 


Monday, October 20, 2014

Cork Wreath

 If you are a wine lover like we are, you probably have plenty of corks around, and there are lots of creative ways to display them. Here, I used a wreath ring to hold the corks in place and glued them to make a cork wreath!  The rings are available at Jo-Ann Fabrics, and probably also at Michaels craft stores in the wreath section. 

There is an outer and inner ring allowing the tension to hold the corks in place. It took some time to fit them all in without warping the whole ring, so I suggest having a large pile of corks available and adding and re-arranging them until you have a nice shape. 


To hold everything in place, I used a hot glue gun, running the glue along the entire outer edge, then along the inner edge, ensuring glue was holding each cork to the metal ring. 


 To hang, here on the back side of our fireplace we have two screws drilled into the brick. This can be done with a mortar bit and a power screwdriver. We have the screws there to hang seasonal decor, but it will now hold my all season rustic cork wreath! 


Note also, the large "M" is from Jo-Anns, it is a cardboard material and I simply glued a piece of thread to either side and hung it on the screws before finishing it off with the wreath.